TensorFlow™是一個基於數據流編程(dataflow programming)的符號數學系統,被廣泛套用於各類機器學習(machine learning)算法的編程實現,其前身是谷歌的神經網路算法庫DistBelief。
Tensorflow擁有多層級結構,可部署於各類伺服器、PC終端和網頁並支持GPU和TPU高性能數值計算,被廣泛套用於谷歌內部的產品開發和各領域的科學研究。
TensorFlow由谷歌人工智慧團隊谷歌大腦(Google Brain)開發和維護,擁有包括TensorFlow Hub、TensorFlow Lite、TensorFlow Research Cloud在內的多個項目以及各類應用程式接口(Application Programming Interface, API)。自2015年11月9日起,TensorFlow依據阿帕奇授權協定(Apache 2.0 open source license)開放原始碼。
基本介紹
- 外文名:TensorFlow
- 開發者:谷歌大腦
- 初始版本:beta/2015年11月9日
- 穩定版本:1.12.0/2018年10月9日
- 程式語言:Python,C++,CUDA
- 平台:Linux,macOS,Windows
- :iOS,Android,Web
- 類型:機器學習庫
- 許可協定:Apache 2.0 open source license
背景
安裝
語言與系統支持
pip install tensorflowconda install -c conda-forge tensorflow
docker pull tensorflow/tensorflow:latest# 可用的tag包括latest、nightly、version等# docker鏡像檔案:https://hub.docker.com/r/tensorflow/tensorflow/tags/docker run -it -p 8888:8888 tensorflow/tensorflow:latest# dock下運行jupyter notebookdocker run -it tensorflow/tensorflow bash# 啟用編譯了tensorflow的bash環境
sudo tar -xz libtensorflow.tar.gz -C /usr/local
sudo ldconfig
# Linuxexport LIBRARY_PATH=$LIBRARY_PATH:~/mydir/libexport LD_LIBRARY_PATH=$LD_LIBRARY_PATH:~/mydir/lib# MacOSexport LIBRARY_PATH=$LIBRARY_PATH:~/mydir/libexport DYLD_LIBRARY_PATH=$DYLD_LIBRARY_PATH:~/mydir/lib
C:\> SET PATH=C:\Program Files\NVIDIA GPU Computing Toolkit\CUDA\v9.0\bin;%PATH%C:\> SET PATH=C:\Program Files\NVIDIA GPU Computing Toolkit\CUDA\v9.0\extras\CUPTI\libx64;%PATH%C:\> SET PATH=C:\tools\cuda\bin;%PATH%
# 確認GPU狀態lspci | grep -i nvidia# 導入GPU加速的TensorFlow鏡像檔案docker pull tensorflow/tensorflow:latest-gpu# 驗證安裝docker run --runtime=nvidia --rm nvidia/cuda nvidia-smi# 啟用bash環境docker run --runtime=nvidia -it tensorflow/tensorflow:latest-gpu bash
版本兼容性
組件與工作原理
核心組件
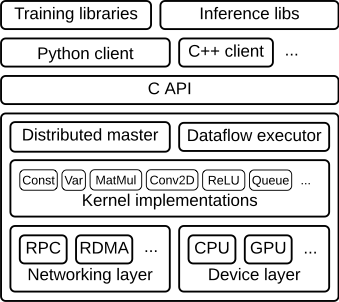 TensorFlow的代碼結構
低階API
import numpy as npimport tensorflow as tf# tf.constant(value, dtype=None, name='Const', verify_shape=False)tf.constant([0, 1, 2], dtype=tf.float32) # 定義常數# tf.placeholder(dtype, shape=None, name=None)tf.placeholder(shape=(None, 2), dtype=tf.float32) # 定義張量占位符#tf.Variable(<initial-value>, name=<optional-name>)tf.Variable(np.random.rand(1, 3), name='random_var', dtype=tf.float32) # 定義變數# tf.SparseTensor(indices, values, dense_shape)tf.SparseTensor(indices=[[0, 0], [1, 2]], values=[1, 2], dense_shape=[3, 4]) # 定義稀疏張量# tf.sparse_placeholder(dtype, shape=None, name=None)tf.sparse_placeholder(dtype=tf.float32)
# 定義二階常數張量a = tf.constant([[0, 1, 2, 3], [4, 5, 6, 7]], dtype=tf.float32)a_rank = tf.rank(a) # 獲取張量的秩a_shape = tf.shape(a) # 獲取張量的形狀b = tf.reshape(a, [4, 2]) # 對張量進行重構# 運行會話以顯示結果with tf.Session() as sess: print('constant tensor: {}'.format(sess.run(a))) print('the rank of tensor: {}'.format(sess.run(a_rank))) print('the shape of tensor: {}'.format(sess.run(a_shape))) print('reshaped tensor: {}'.format(sess.run(b))) # 對張量進行切片 print("tensor's first column: {}".format(sess.run(a[:, 0])))constant = tf.constant([1, 2, 3]) # 定義常數張量square = constant*constant # 操作(平方)# 運行會話with tf.Session() as sess: print(square.eval()) # “評估”操作所得常數張量的值
# 例1:使用TensorFlow的全局隨機初始化器a = tf.get_variable(name='var5', shape=[1, 2])init = tf.global_variables_initializer()with tf.Session() as sess: sess.run(init) print(a.eval())# 例2:自行定義初始化器# tf.get_variable(name, shape=None, dtype=None, initializer=None, trainable=None, ...)var1 = tf.get_variable(name="zero_var", shape=[1, 2, 3], dtype=tf.float32, initializer=tf.zeros_initializer) # 定義全零初始化的三維變數var2 = tf.get_variable(name="user_var", initializer=tf.constant([1, 2, 3], dtype=tf.float32)) # 使用常數初始化變數,此時不指定形狀shape
- 本地變數:tf.GraphKeys.LOCAL_VARIABLES
- 全局變數:tf.GraphKeys.GLOBAL_VARIABLES
- 訓練梯度變數:tf.GraphKeys.TRAINABLE_VARIABLES
var3 = tf.get_variable(name="local_var", shape=(), collections=[tf.GraphKeys.LOCAL_VARIABLES])
def toy_model(): 定義包含變數的操作 var1 = tf.get_variable(name="user_var5", initializer=tf.constant([1, 2, 3], dtype=tf.float32)) var2 = tf.get_variable(name="user_var6", initializer=tf.constant([1, 1, 1], dtype=tf.float32)) return var1+var2with tf.variable_scope("model") as scope: output1 = toy_model() # reuse語句後二次利用變數 scope.reuse_variables() output2 = toy_model()# 在variable_scope程式塊內啟用reusewith tf.variable_scope(scope, reuse=True): output3 = toy_model()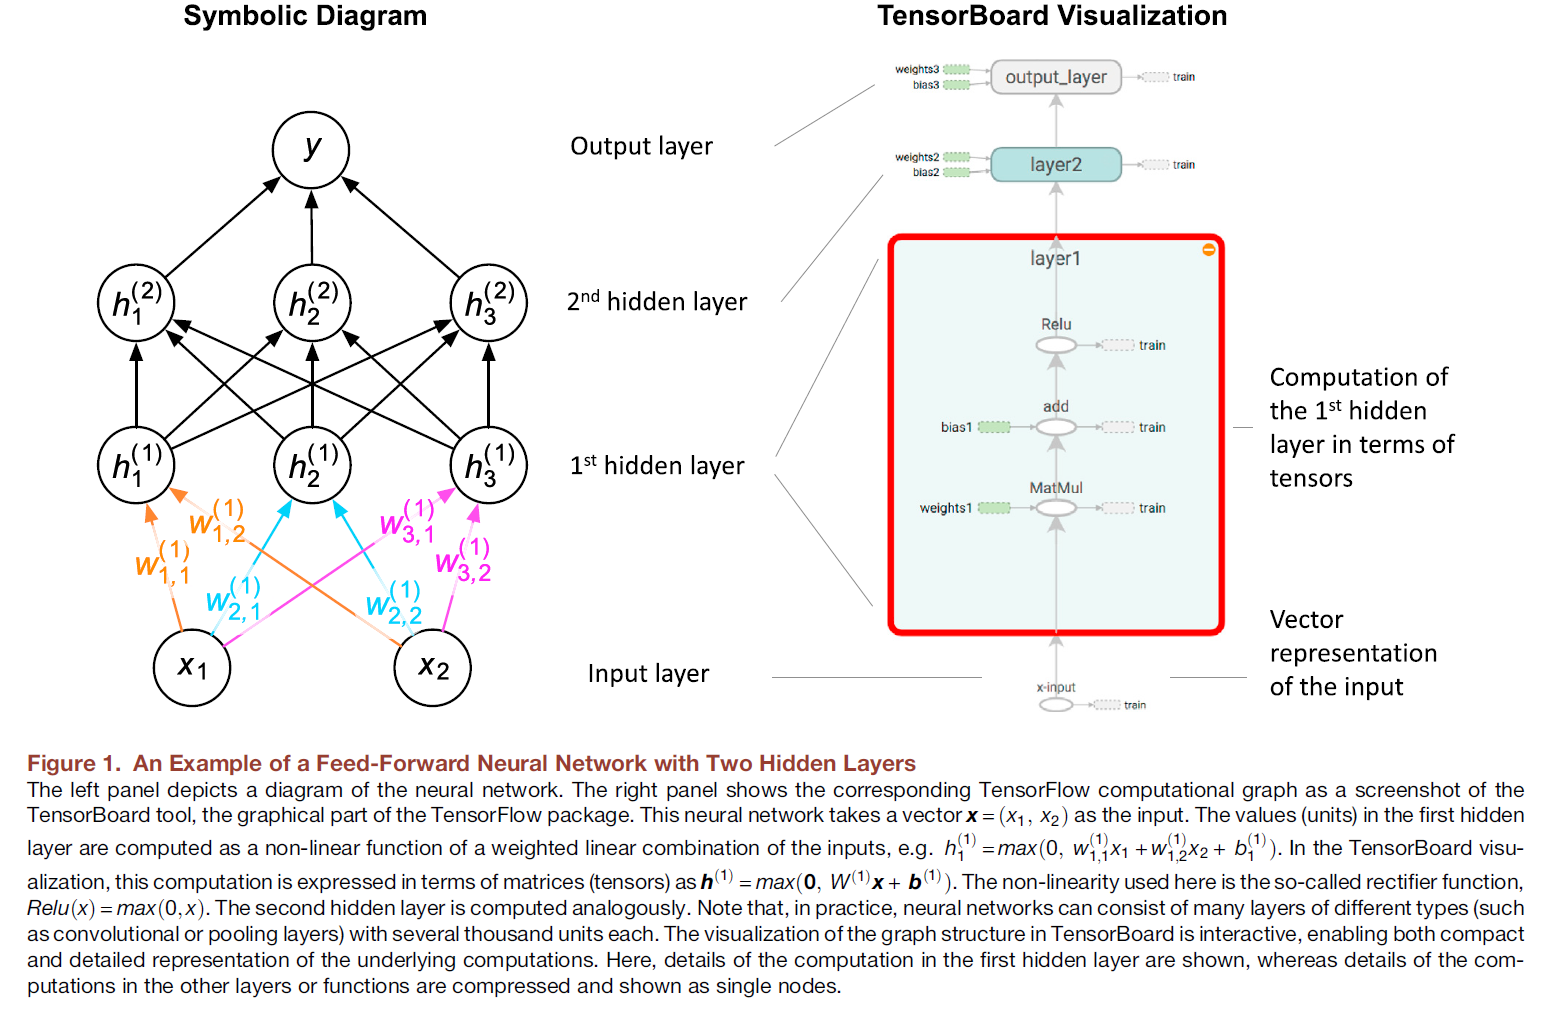 一個前饋神經網路的拓撲結構(左)和TensorFlow數據流圖(右)
# 導入模組import numpy as npimport tensorflow as tf# 準備學習數據train_X = np.random.normal(1, 5, 200) # 輸入特徵train_Y = 0.5*train_X+2+np.random.normal(0, 1, 200) # 學習目標L = len(train_X) # 樣本量# 定義學習超參數epoch = 200 # 紀元數(使用所有學習數據一次為1紀元)learn_rate = 0.005 # 學習速度# 定義數據流圖temp_graph = tf.Graph()with temp_graph.as_default(): X = tf.placeholder(tf.float32) # 定義張量占位符 Y = tf.placeholder(tf.float32) k = tf.Variable(np.random.randn(), dtype=tf.float32) b = tf.Variable(0, dtype=tf.float32) # 定義變數 linear_model = k*X+b # 線性模型 cost = tf.reduce_mean(tf.square(linear_model - Y)) # 代價函式 optimizer = tf.train.GradientDescentOptimizer(learning_rate=learn_rate) # 梯度下降算法 train_step = optimizer.minimize(cost) # 最小化代價函式 init = tf.global_variables_initializer() # 使用變數全局初始化選項train_curve = [] # 定義列表存儲學習曲線with tf.Session(graph=temp_graph) as sess: sess.run(init) # 變數初始化 for i in range(epoch): sess.run(train_step, feed_dict={X: train_X, Y: train_Y}) # 運行“最小化代價函式” temp_cost = sess.run(cost, feed_dict={X: train_X, Y: train_Y}) # 代價函式 train_curve.append(temp_cost) # 學習曲線 kt_k = sess.run(k); kt_b = sess.run(b) # 運行“模型參數” Y_pred = sess.run(linear_model, feed_dict={X: train_X}) # 運行“模型”得到學習結果# 繪製學習結果ax1 = plt.subplot(1, 2, 1); ax1.set_title('Linear model fit');ax1.plot(train_X, train_Y, 'b.'); ax1.plot(train_X, Y_pred, 'r-')ax2 = plt.subplot(1, 2, 2); ax2.set_title('Training curve');ax2.plot(train_curve, 'r--')import tensorflow as tf# 保存變數var = tf.get_variable("var_name", [5], initializer = tf.zeros_initializer) # 定義saver = tf.train.Saver({"var_name": var}) # 不指定變數字典時保存所有變數with tf.Session() as sess: var.initializer.run() # 變數初始化 # 在當前路徑保存變數 saver.save(sess, "./model.ckpt")# 讀取變數tf.reset_default_graph() # 清空所有變數var = tf.get_variable("var_name", [5], initializer = tf.zeros_initializer)saver = tf.train.Saver({"var_name": var}) # 使用相同的變數名with tf.Session() as sess: # 讀取變數(無需初始化) saver.restore(sess, "./model.ckpt")from tensorflow.python.tools import inspect_checkpoint as chkp# 顯示所有張量(指定tensor_name=''可檢索特定張量)chkp.print_tensors_in_checkpoint_file("./model.ckpt", tensor_name='', all_tensors=True)from tensorflow.python.saved_model import tag_constantsexport_dir = '' # 定義保存路徑# ...(略去)定義圖...with tf.Session(graph=tf.Graph()) as sess: # ...(略去)運行圖... # 保存圖 tf.saved_model.simple_save(sess, export_dir, inputs={"x": x, "y": y}, outputs={"z": z}) tf.saved_model.loader.load(sess, [tag_constants.TRAINING], export_dir) # tag默認為SERVING高階API
import numpy as npimport tensorflow as tffrom tensorflow import keras# 讀取google fashion圖像分類數據fashion_mnist = keras.datasets.fashion_mnist(train_images, train_labels), (test_images, test_labels) = fashion_mnist.load_data()# 轉化像素值為浮點數train_images = train_images / 255.0test_images = test_images / 255.0# 使用NumPy數組構建數據集導入函式train_input_fn = tf.estimator.inputs.numpy_input_fn( x={"pixels": train_images}, y=train_labels.astype(np.int32), shuffle=True)test_input_fn = tf.estimator.inputs.numpy_input_fn( x={"pixels": test_images}, y=test_labels.astype(np.int32), shuffle=False)# 定義特徵列(numeric_column為數值型)feature_columns = [tf.feature_column.numeric_column("pixels", shape=[28, 28])]# 定義深度學習神經網路分類器,新建資料夾estimator_test保存檢查點classifier = tf.estimator.DNNClassifier( feature_columns=feature_columns, hidden_units=[128, 128], optimizer=tf.train.AdamOptimizer(1e-4), n_classes=10, model_dir = './estimator_test')classifier.train(input_fn=train_input_fn, steps=20000) # 學習model_eval = classifier.evaluate(input_fn=test_input_fn) # 評估# 導入模組和數據集的步驟與前一程式示例相同def my_model(features, labels, mode, params): # 仿DNNClassifier構建的自定義分類器 # 定義輸入層-隱含層-輸出層 net = tf.feature_column.input_layer(features, params['feature_columns']) for units in params['hidden_units']: net = tf.layers.dense(net, units=units, activation=tf.nn.relu) logits = tf.layers.dense(net, params['n_classes'], activation=None) # argmax函式轉化輸出結果 predicted_classes = tf.argmax(logits, 1) # (學習完畢後的)預測模式 if mode == tf.estimator.ModeKeys.PREDICT: predictions = {'class_ids': predicted_classes[:, tf.newaxis]} return tf.estimator.EstimatorSpec(mode, predictions=predictions) # 定義損失函式 loss = tf.losses.sparse_softmax_cross_entropy(labels=labels, logits=logits) # 計算評估指標(以分類精度為例) accuracy = tf.metrics.accuracy(labels=labels, predictions=predicted_classes, name='acc_op') metrics = {'accuracy': accuracy} tf.summary.scalar('accuracy', accuracy[1]) if mode == tf.estimator.ModeKeys.EVAL: # 評估模式 return tf.estimator.EstimatorSpec(mode, loss=loss, eval_metric_ops=metrics) else: # 學習模式 assert mode == tf.estimator.ModeKeys.TRAIN optimizer = tf.train.AdagradOptimizer(learning_rate=0.1) # 定義最佳化器 train_op = optimizer.minimize(loss, global_step=tf.train.get_global_step()) # 最佳化損失函式 return tf.estimator.EstimatorSpec(mode, loss=loss, train_op=train_op)# 調用自定義模型,使用前一程式示例中的 1.構建數據集導入函式 和 2. 特徵列classifier = tf.estimator.Estimator(model_fn=my_model, params={ 'feature_columns': feature_columns, 'hidden_units': [64, 64], 'n_classes': 10})# 學習(後續的評估/預測步驟與先前相同)classifier.train(input_fn=train_input_fn, steps=20000)# 每20分鐘保存一次檢查點/保留最新的10個檢查點my_checkpoint = tf.estimator.RunConfig(save_checkpoints_secs = 20*60, keep_checkpoint_max = 10)# 使用新的檢查點規則重新編譯先前模型(保持模型結構不變)classifier = tf.estimator.DNNClassifier( feature_columns=feature_columns, hidden_units=[128, 128], model_dir = './estimator_test', config=my_checkpoint)
import tensorflow as tffrom tensorflow import keras# 讀取google fashion圖像分類數據fashion_mnist = keras.datasets.fashion_mnist(train_images, train_labels), (test_images, test_labels) = fashion_mnist.load_data()# 轉化像素值為浮點數train_images = train_images / 255.0test_images = test_images / 255.0# 構建輸入層-隱含層-輸出層model = keras.Sequential([ keras.layers.Flatten(input_shape=(28, 28)), keras.layers.Dense(128, activation=tf.nn.relu), keras.layers.Dense(10, activation=tf.nn.softmax)])# 設定最佳化算法、損失函式model.compile(optimizer=tf.keras.optimizers.Adam(lr=0.001), loss='sparse_categorical_crossentropy', metrics=['accuracy'])# 開始學習(epochs=5)model.fit(train_images, train_labels, epochs=5)# 模型評估test_loss, test_acc = model.evaluate(test_images, test_labels)print('Test accuracy:', test_acc)# 預測predictions = model.predict(test_images)# 保存模式和模式參數model.save_weights('./keras_test') # 在當前路徑新建資料夾model.save('my_model.h5')# 從檔案恢復模型和學習參數model = keras.models.load_model('my_model.h5')model.load_weights('./keras_test')# 新建資料夾存放Estimtor檢查點est_model = tf.keras.estimator.model_to_estimator(keras_model=model, model_dir='./estimtor_test')import tensorflow as tftf.enable_eager_execution()
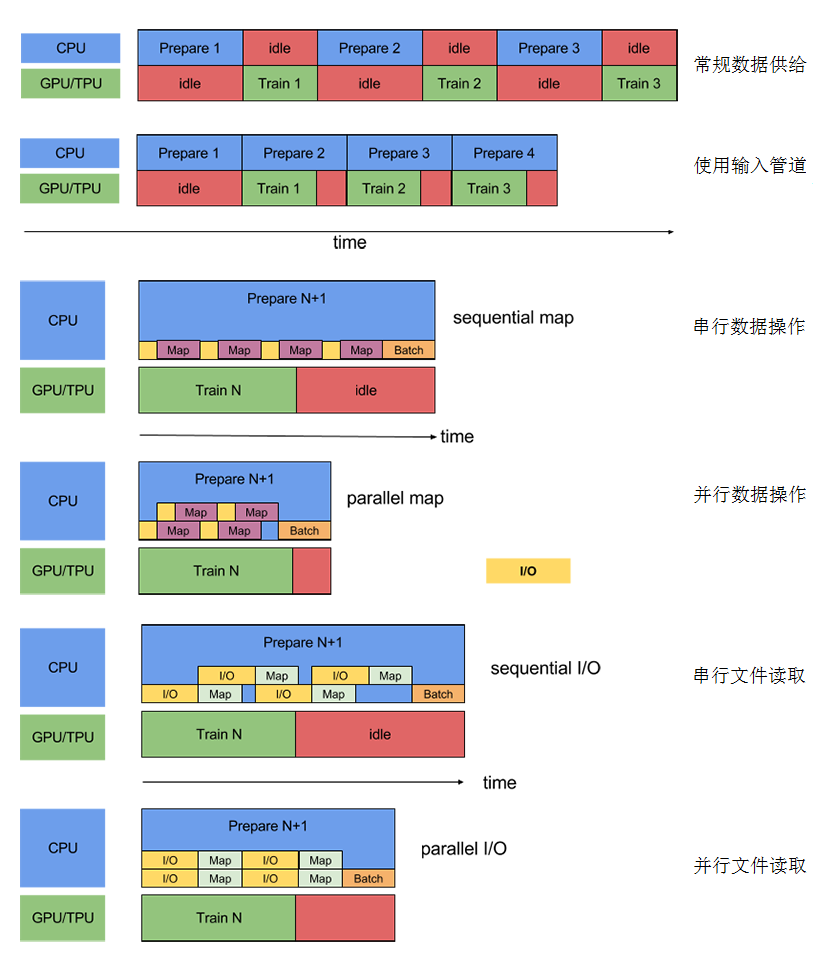 TensorFlow輸入管道的設備占用策略
- 提取(Extract):從本地或雲端的數據存儲點讀取原始數據
- 轉化(Transform):使用計算設備(通常為CPU)對數據進行解析和後處理,例如解壓縮、洗牌(shuffling)、打包(batching)等
- 載入(Load):在運行機器學習算法的高性能計算設備(GPU和TPU)載入經過後處理的數據
import tensorflow as tf# 使用FLAG統一管理輸入管道參數FLAGS = tf.app.flags.FLAGStf.app.flags.DEFINE_integer('num_parallel_readers', 0, 'doc info')tf.app.flags.DEFINE_integer('shuffle_buffer_size', 0, 'doc info')tf.app.flags.DEFINE_integer('batch_size', 0, 'doc info')tf.app.flags.DEFINE_integer('num_parallel_calls', 0, 'doc info')tf.app.flags.DEFINE_integer('prefetch_buffer_size', 0, 'doc info')# 自定義操作(map)def map_fn(example): # 定義數據格式(圖像、分類標籤) example_fmt = {"image": tf.FixedLenFeature((), tf.string, ""), "label": tf.FixedLenFeature((), tf.int64, -1)} # 按格式解析數據 parsed = tf.parse_single_example(example, example_fmt) image = tf.image.decode_image(parsed["image"]) # 圖像解碼操作 return image, parsed["label"]# 輸入函式def input_fn(argv): # 列出路徑的所有TFRData檔案(修改路徑後) files = tf.data.Dataset.list_files("/path/TFRData*") # 並行交叉讀取數據 dataset = files.apply( tf.contrib.data.parallel_interleave( tf.data.TFRecordDataset, cycle_length=FLAGS.num_parallel_readers)) dataset = dataset.shuffle(buffer_size=FLAGS.shuffle_buffer_size) # 數據洗牌 # map和batch的並行操作 dataset = dataset.apply( tf.contrib.data.map_and_batch(map_func=map_fn, batch_size=FLAGS.batch_size, num_parallel_calls=FLAGS.num_parallel_calls)) dataset = dataset.prefetch(buffer_size=FLAGS.prefetch_buffer_size) # 數據預讀取設定 return dataset# argv的第一個字元串為說明tf.app.run(input_fn, argv=['pipline_params', '--num_parallel_readers', '2', '--shuffle_buffer_size', '50', '--batch_size', '50', '--num_parallel_calls, 4' '--prefetch_buffer_size', '50'])加速器
# 構建數據流圖.a = tf.constant([1.0, 2.0, 3.0, 4.0, 5.0, 6.0], shape=[2, 3], name='a')b = tf.constant([1.0, 2.0, 3.0, 4.0, 5.0, 6.0], shape=[3, 2], name='b')c = tf.matmul(a, b)# 啟用會話並設定log_device_placement=True.with tf.Session(config=tf.ConfigProto(log_device_placement=True)) as sess: print(sess.run(c))# 終端中可見信息:MatMul: (MatMul): /job:localhost/replica:0/task:0/device:CPU:0…
- 記憶體動態分配選項allow_growth可以根據需要分配GPU記憶體,該選項在開啟時會少量分配記憶體,並隨著會話的運行對占用記憶體區域進行擴展。TensorFlow會話默認不釋放記憶體,以避免記憶體碎片問題。
- per_process_gpu_memory_fraction 選項決定每個進程所允許的GPU記憶體最大比例。
config = tf.ConfigProto()config.gpu_options.allow_growth = True # 開啟GPU記憶體動態分配config.gpu_options.per_process_gpu_memory_fraction = 0.4 # 記憶體最大占用比例為40%with tf.Session(config=config) as sess: # ...(略去)會話內容 ...
/job:<JOB_NAME>/task:<TASK_INDEX>/device:<DEVICE_TYPE>:<DEVICE_INDEX>
# 手動分配with tf.device("/device:GPU:1"): var = tf.get_variable("var", [1])# 自動分配cluster_spec = { "ps": ["ps0:2222", "ps1:2222"], "worker": ["worker0:2222", "worker1:2222", "worker2:2222"]}with tf.device(tf.train.replica_device_setter(cluster=cluster_spec)): v = tf.get_variable("var", shape=[20, 20])c = [] # 在GPU:1和GPU:2定義張量 (運行該例子要求系統存在對應GPU設備)for d in ['/device:GPU:1', '/device:GPU:2']: with tf.device(d): a = tf.constant([1.0, 2.0, 3.0, 4.0, 5.0, 6.0], shape=[2, 3]) b = tf.constant([1.0, 2.0, 3.0, 4.0, 5.0, 6.0], shape=[3, 2]) c.append(tf.matmul(a, b))# 在CPU定義相加運算with tf.device('/cpu:0'): my_sum = tf.add_n(c)# 啟用會話with tf.Session(config=tf.ConfigProto(log_device_placement=True)) as sess: print(sess.run(my_sum))最佳化器
import tensorflow as tfconverter = tf.contrib.lite.TocoConverter.from_saved_model(path) # 從路徑導入模型converter.post_training_quantize = True # 開啟學習後量化tflite_quantized_model = converter.convert() # 輸出量化後的模型open("quantized_model.tflite", "wb").write(tflite_quantized_model) # 寫入新檔案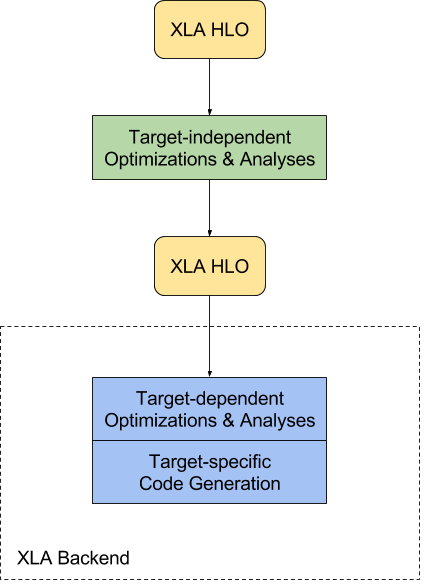 XLA工作流程
可視化工具
# 為低層API構建檔案my_graph = tf.Graph()with my_graph.as_default(): # 構建數據流圖with tf.Session(graph=my_graph) as sess: # 會話操作 file_writer = tf.summary.FileWriter('/user_log_path', sess.graph) # 輸出檔案# 為Keras模型構建檔案import tensorflow.keras as kerastensorboard = keras.callbacks.TensorBoard(log_dir='./logs')# … (略去)用戶自定義模型 ...model.fit(callbacks=[tensorboard]) # 調用fit時載入callbacktensorboard --logdir=/user_log_path
調試程式
from tensorflow.python import debug as tf_debugwith tf.Session() as sess: sess = tf_debug.LocalCLIDebugWrapperSession(sess) print(sess.run(c))
# 調試EstimatorImport tensorflow as tffrom tensorflow.python import debug as tf_debughooks = [tf_debug.LocalCLIDebugHook()] # 創建調試掛鈎# classifier = tf.estimator. … 調用Estimator模型classifier.fit(x, y, steps, monitors=hooks) # 調試fitclassifier.evaluate(x, y, hooks=hooks) # 調試evaluate# 調試Kerasfrom keras import backend as keras_backend# 在程式開始時打開後端會話封裝keras_backend.set_session(tf_debug.LocalCLIDebugWrapperSession(tf.Session()))# 構建Keras模型model.fit(...) # 使用模型學習時進入調試界面(CLI)
部署
import tensorflow as tfc = tf.constant("Hello, distributed TensorFlow!")# 建立伺服器server = tf.train.Server.create_local_server()# 在伺服器運行會話with tf.Session(server.target) as sess sess.run(c)# 假設有區域網路內伺服器localhost:2222和localhost:2223# 在第一台機器建立任務cluster = tf.train.ClusterSpec({"local": ["localhost:2222", "localhost:2223"]})server = tf.train.Server(cluster, job_name="local", task_index=0)# 在第二台機器建立任務cluster = tf.train.ClusterSpec({"local": ["localhost:2222", "localhost:2223"]})server = tf.train.Server(cluster, job_name="local", task_index=1)安全性
編號 | 內容 | 版本 | 報告方 |
TFSA-2018-006 | 惡意構造編譯檔案引起非法記憶體訪問 | 1.7及以下 | Tencent Blade Team |
TFSA-2018-005 | (原文)“Old Snappy Library Usage Resulting in Memcpy Parameter Overlap” | 1.7及以下 | Tencent Blade Team |
TFSA-2018-004 | 檢查點源檔案越界讀取 | 1.7及以下 | Tencent Blade Team |
TFSA-2018-003 | TensorFlow Lite TOCO FlatBuffer庫解析漏洞 | 1.7及以下 | Tencent Blade Team |
TFSA-2018-002 | (原文)“GIF File Parsing Null Pointer Dereference Error” | 1.5及以下 | Tencent Blade Team |
TFSA-2018-001 | BMP檔案解析越界讀取 | 1.6及以下 | Tencent Blade Team |
生態系統
社區
項目
套用開發
研究
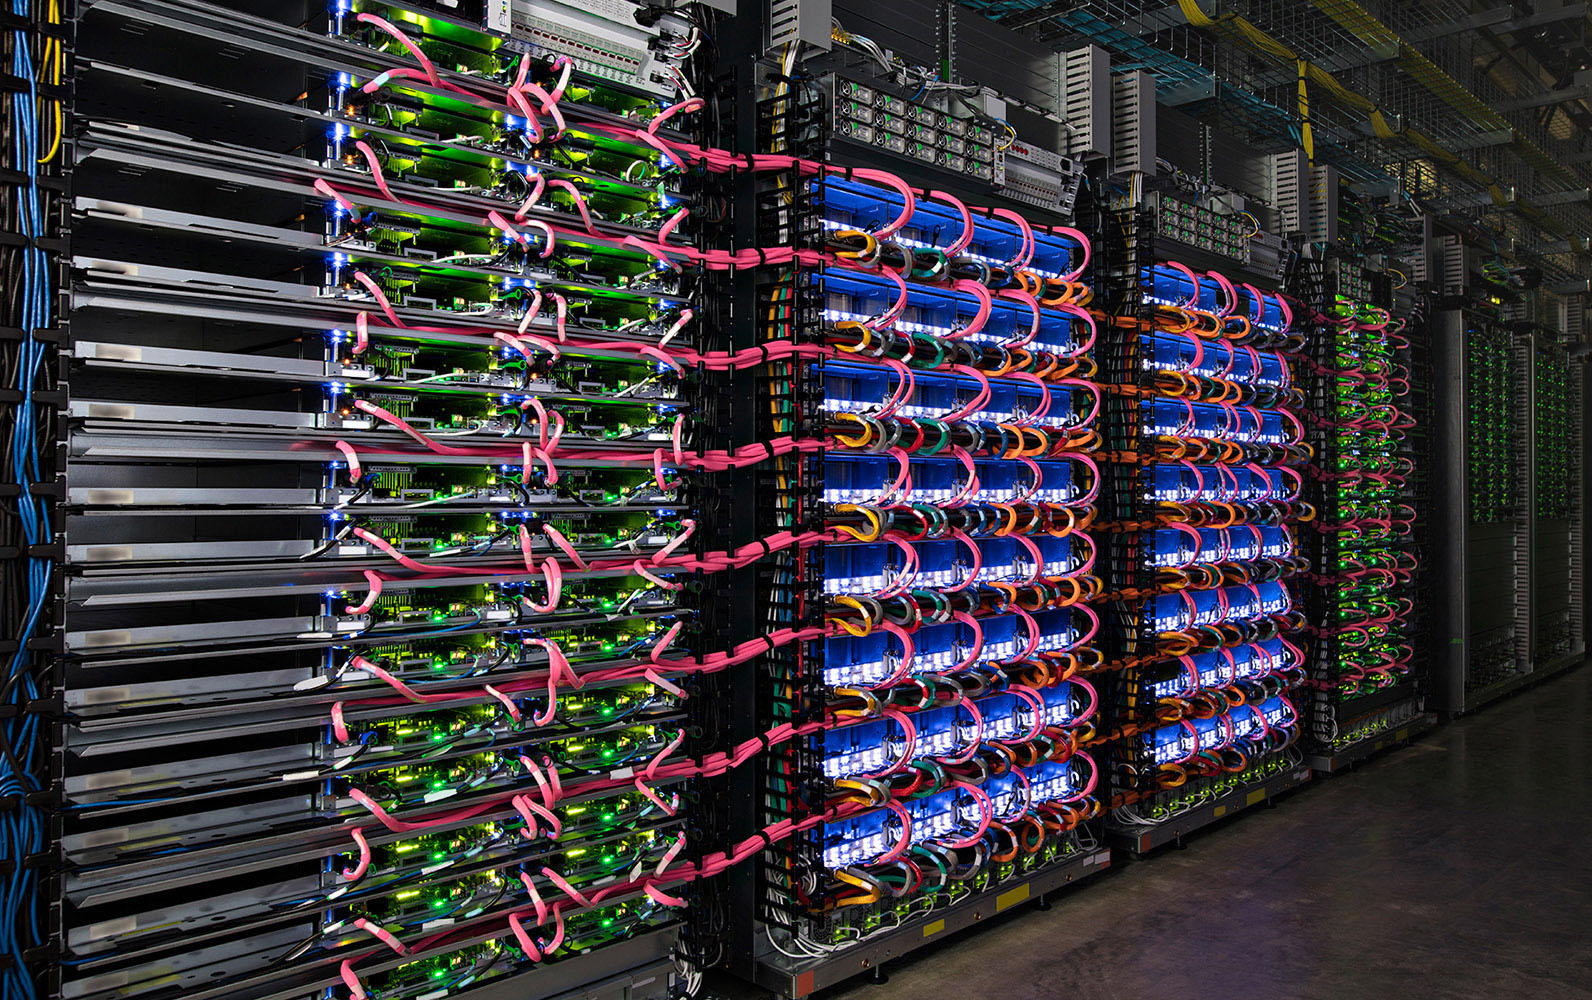 谷歌雲計算服務中的TPU計算集群